안녕하세요 오늘은 spinner에 대해 사용해보겠습니다
보통, 문자 인증 시 통신사 선택할 때 자주 사용되는데
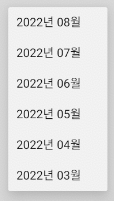
저는 DatePicker 대신 년도+월을 선택할 수 있는 Spinner를 만들고자 합니다
(화면에 날짜를 선택하는 영역을 최대한 줄이고 싶어서요)
Spinner
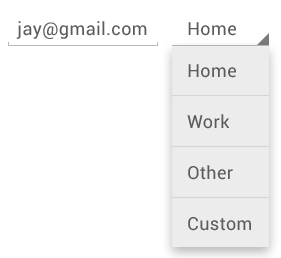
드롭다운의 형태로 여러 개의 데이터 중 하나의 데이터를 선택할 수 있는 View입니다
자주 접하는 모양의 View일 거에요, 문자 인증 시 통신사를 선택하거나 이메일 주소를 선택할 때 등등

기본 형태는 위와 같지만, 저는 배경도 바꾸고 싶고 icon도 변경하고 싶어서 Custom을 하겠습니다 🚀
Spinner 사용하기
1. xml에 Spinner 선언
<Spinner
   android:id="@+id/spinner"
   android:layout_width="wrap_content"
   android:layout_height="40dp"
   android:layout_marginTop="20dp"
   android:background="@drawable/spinner_bg"
   app:layout_constraintEnd_toEndOf="parent"
   app:layout_constraintStart_toStartOf="parent"
   app:layout_constraintTop_toTopOf="parent" />
2. Activity or Fragment에 SpinnerAdapter 연결
Spinner에 데이터를 표시하기 위해선 SpinnerAdapter를 연결해줘야하는데, 2가지 형태가 가능합니다
1️⃣ 선택 항목을 배열에서 사용할 수 있는 경우에는 ArrayAdapter
2️⃣ 선택 항목을 데이터베이스 쿼리에서 사용할 수 있는 경우에는 CursorAdapter
이번 포스팅에선 1️⃣의 ArrayAdapter를 사용하겠습니다
3. ArrayAdapter 생성
ArrayAdapter의 원형은 아래와 같습니다 (Context, Layout, 데이터 배열)
public ArrayAdapter(@NonNull Context context, int resource, @NonNull T[] objects) {
    throw new RuntimeException("Stub!");
}
@NonNull T[] objects 을 생성하는데 , 이 방법도 2가지가 있어요
1️⃣ 리소스파일에 선언된 배열을 사용
<?xml version="1.0" encoding="utf-8"?>
<resources>
    <string-array name="planets_array">
        <item>Mercury</item>
        <item>Venus</item>
        <item>Earth</item>
        <item>Mars</item>
        <item>Jupiter</item>
        <item>Saturn</item>
        <item>Uranus</item>
        <item>Neptune</item>
    </string-array>
</resources>
2️⃣ 소스 내의 데이터를 사용
저는 현재 년도, 월 기준으로 beforeCount의 이전까지만 가져올거라 아래처럼 데이터를 채워주고
fun getCurrentTimeBefore(beforeCount: Int): Array<String> {
    val simple = SimpleDateFormat("yyyyMM", Locale.KOREA)
    val result = simple.format(Date(System.currentTimeMillis()))

    val calendar = Calendar.getInstance()
    calendar.time = simple.parse(result)!!
    val str = ArrayList<String>()

    repeat(beforeCount) {
        val month: String = simple.format(calendar.time)
        str.add(month.substring(0, 4) + "년 " + month.substring(4, 6) + "월")
        calendar.add(Calendar.MONTH, -1)
    }

    return str.toTypedArray()
}
4. Spinner Background 및 레이아웃 생성

제가 생성하고 싶은 Spinner Background에 맞춰, 오른쪽에 들어갈 이미지 파일을 넣어줍니다

[spinner_bg.xml]
<?xml version="1.0" encoding="utf-8"?>
<layer-list xmlns:android="http://schemas.android.com/apk/res/android">
    <item>
        <shape>
            <solid android:color="#FBF1FF"/>
            <corners android:radius="10dp" />
        </shape>
    </item>
    <item
        android:width="24dp"
        android:height="24dp"
        android:bottom="10dp"
        android:drawable="@drawable/btn_down"
        android:gravity="right|top"
        android:right="8dp"
        android:start="8dp"
        android:top="8dp"/>
</layer-list>
[spinner_txt.xml]
<?xml version="1.0" encoding="utf-8"?>
<TextView xmlns:android="http://schemas.android.com/apk/res/android"
    android:id="@+id/tv"
    android:layout_width="match_parent"
    android:layout_height="wrap_content"
    android:paddingStart="10dp"
    android:paddingTop="8dp"
    android:paddingEnd="33dp"
    android:paddingBottom="10dp"
    android:text="@+id/tv"
    android:textColor="#000000"
    android:textSize="15dp" />
5. Spinner Adapter 연결 및 onItemSelectedListener 생성
val arr = getCurrentTimeBefore(6)
var spinnerAdapter =
    ArrayAdapter(this@MainActivity, R.layout.spinner_txt, arr)
spinner.adapter = spinnerAdapter

spinner.onItemSelectedListener = object : AdapterView.OnItemSelectedListener {
     override fun onItemSelected(parent: AdapterView<*>, view: View?, pos: Int, id: Long) {
            Toast.makeText(this@MainActivity, arr[pos], Toast.LENGTH_LONG).show()
     }

     override fun onNothingSelected(p0: AdapterView<*>?) {
                //
     }
}
onItemSelected(parent: AdapterView<*>, view: View?, pos: Int, id: Long)
pos를 사용해 현재 선택된 spinner의 데이터를 가져옵니다


'📱 Android' 카테고리의 다른 글
| [Hilt] 코드랩으로 Hilt 익히기 # 1 (0) | 2023.01.07 |
|---|---|
| DI (Dependency Injection) 의존성 주입 (0) | 2022.12.05 |
| [Android] Custom Rating Bar (0) | 2022.08.04 |
| [Android] RecyclerView - MultiViewHolder(2) (0) | 2022.07.13 |
| [Android] Fragment LifeCycle (0) | 2022.07.06 |